Distance
of complete exposure, giving even grander sights as the worn path ascends toward Wilcox Pass. Twenty more minutes of intoxicating uphill walking and the trail levels off at Wilcox Pass.
Continue along the main trail and after an hour or more from the trailhead an elevated, marked viewpoint is unmistakable on the right side of the path. Some 15–20 m past the marker, the trail toward Mount Wilcox takes a left turn off the main corridor. As mentioned, there are two routes up Mount Wilcox and they both begin at this intersection. Regardless of which path you take, there is only 531 m left to scramble, as most of the elevation has been achieved while hiking up to Wilcox Pass. Of the two approaches, the obvious one is on the east slope, where the trail is very visible as you close in on the mountain. The other way begins at the foot of the mountain on the far south end of it.
It takes about ten additional minutes to get to the base of the mountain doing the south option, but it is a much easier journey walking up a gradual incline atop a gorgeous ridge. After turning onto the left trail, heading west, continue on this for 30 minutes, making certain you skirt around the left side of the massive bog you may be tempted to shortcut across. The views from the ridge walk allow for grander sights, since both the east and west sides of the mountain can be accessed. The only obstacle that breaks up the walk is a rock wall another 20 minutes into the hike. Really, this only appears to be an obstacle; by following the trail right to the rock, you’ll find a crack in the wall that allows easy access up to the top. Once you are up there, continue the trail until it converges with the ridge to reach the east trail.
The rubble path meandering up the east slope is visible from the viewpoint intersection and is the most popular way. Follow the same trail as the first route, turning left just beyond the viewpoint, but veer off it and over the open alpine sooner rather than later. There does not appear to be a defined trail across the meadows, so try to avoid stomping on the foliage and set foot on firm ground whenever possible. Even though the path up the side of the east slope has been beaten down, it still consists of rubble and scree, making this choice somewhat more laborious. Supplement this with a steeper, more direct challenge with fewer views, and the southern option is definitely preferred.
Regardless of which course you take, they both join atop a beautiful plateau. The stroll on the plateau allows for lung, heart and leg recovery while enjoying the scenery. This ends shortly, though, as you approach a large rock abutment that is impenetrable. There is a trail leading to the bluff, as many scramblers have vainly attempted to conquer it. Watch for the path that stays level and bypasses the bluff on the scree slope around the right side of it. Since this is a scree slope, many trails fade and then reappear, but they are there, so stay up high as you traverse the slope, keeping an eye out for cairns and trails. Continue this course until reaching the second bluff, which comes into sight soon after you’ve circumnavigated the first one. All of the scree trails eventually reach up toward the apex of the second bluff, as they all converge at a notch near the top. From here, overtaking the bluff is easy.
This has been a lot of work so far, but the summit is now within reach. Popping up out of the notch, you immediately see the summit, and a five- to ten-minute walk on terra firma puts you there. Congratulations. The true summit involves some moderate exposure (see p. 166 as to “exposure”).
Views are 360 degrees, displaying Nigel Peak almost due east at 96º true, Mount Athabasca to the southeast and Snow Dome 8 km to the southeast.
Directions
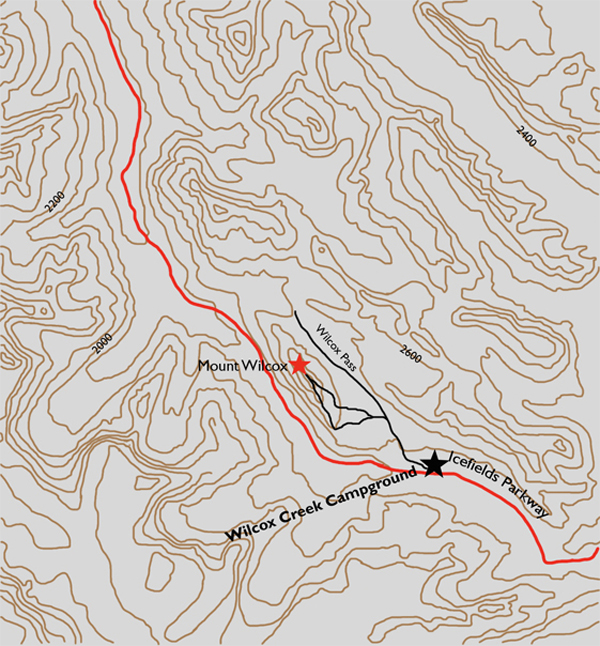
The trailhead for Wilcox Pass is at the lower parking lot of Wilcox Creek Campground, on the east side of the Icefields Parkway 2.8 km south of the Columbia Icefield Centre, or 127 km north of the junction of the Trans-Canada Highway and the Icefields Parkway. Follow the trailhead marker for Wilcox Pass.